Refugees Code
React: Intro
React: Intro
Introduction to React.js
We are now in the last stage of our journey to become front-end developers. Congratulations for having reached this far! We have already learned the tools to provide our websites with a great user experience, which implies that they are aesthetically pleasing, they are well organized and users can get what they want from the website in a fast and simple way. Now we will learn a new tool that will help us very much in reaching our goal: a Javascript library originally created by Facebook called React
Goals
- We will start the implementation of an UI following a series of steps to decide how to add interactivity. First we will use only Javascript and they we will do the same using React
- We will review the reasons why React is a great tool for front-end development
- We will learn:
- How to start a React project
- How files are structured inside it
- How components are created and managed
- What are component props and to use them
Implementing an UI
Given the following screen:
Let's follow the following steps to implement it: 1. Break the UI into elements
2. Build the html version
3. Define interactivity: triggers, events and data that changes (state)
4. Add interactivity
Using Javascript
Give it a try for yourself. Use what you have learned so far about the DOM (Document Object Model).
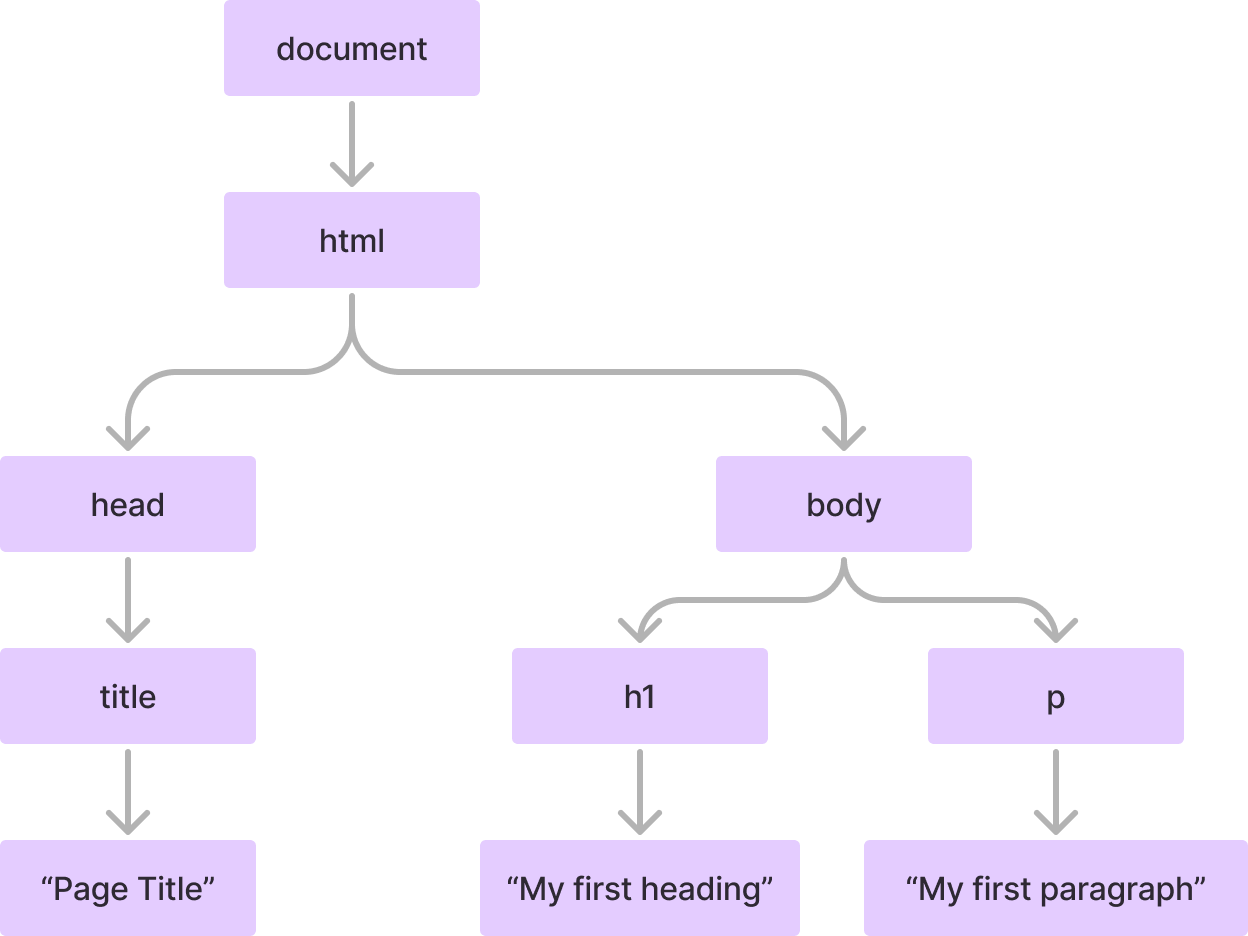
As a quick reminder, for this html:
<!DOCTYPE html><html lang="en">
<head> <title>Page Title</title></head>
<body> <h1>"My first heading</h1> <p>"My first paragraph"</p></body>
</html>the DOM tree chart is this:
One possible implementation (Check only after you have tried for yourself ;-)
Javascript ImplementationUsing React
- Setting up the development environment (Node.js, npm, vite)
- Understanding JSX (Javascript XML)
- Components and Props
Intro
To develop a project using React we could something like this on a html file:
<!DOCTYPE html><html lang="en"> <head> <meta charset="UTF-8" /> <meta name="viewport" content="width=#root, initial-scale=1.0" /> <title>Document</title> </head>
<body> <!-- A div element with id 'root' where our React app will be mounted --> <div id="root"></div> <!-- Importing the React library --> <script src="https://unpkg.com/react@16.7.0/umd/react.production.min.js"></script> <!-- Importing the ReactDOM library, which provides DOM-specific methods --> <script src="https://unpkg.com/react-dom@16.7.0/umd/react-dom.production.min.js"></script> <!-- Importing Babel which will transpile React into regular JavaScript --> <script src="https://unpkg.com/babel-standalone@6.26.0/babel.js"></script> <!-- Our React code goes here --> <script type="text/babel"> // Getting a reference to the 'root' div const rootElement = document.getElementById("root"); // Creating a simple JSX element -This looks like HTML but is not const element = <div className="container">Hello World!</div>; // Rendering our JSX element inside the 'root' div ReactDOM.render(element, rootElement); </script> </body></html>React enables us to write code that resembles HTML (known as JSX), which greatly streamlines the development process. Consider the number of lines of code required to create an element, set its attributes, and render it by manipulating the DOM. By using JSX instead, we can significantly reduce this!
This is possible through a process known as ‘transpilation’. Transpilation involves transforming code written in one high-level language into another high-level language. In the case of React, we use Babel to transpile JSX into JavaScript code that can be executed by the browser. This process is analogous to compilation, which transforms code from a high-level language (like Java) into a low-level language (like assembly), or even machine code.
Creating our first project
Rather than manually handling these processes, we will utilize Vite. It automates the setup and transpilation tasks for us. Additionally, it provides a development server that instantly displays our code in the browser as we write it. In order to use Vite we need Node, so is Node installed in your computer? If you are not sure type this in your terminal
node --versionIf you get something similar to this:
bash: node: command not foundThen proceed to Node site and follow the instructions for your OS. Having confirmed that Node is install, proceed to create your first React project with the command:
npm create vite@latestAnswer the prompts like this:
- Project name: mfrReact
- Select a framework: React
- Select a variant: Javascript and then execute:
cd mfrReactnpm installnpm run devReviewing how the project is structured
First file we are going to study is index.html at the root:
<!DOCTYPE html><html lang="en"> <head> <meta charset="UTF-8" /> <link rel="icon" type="image/svg+xml" href="/vite.svg" /> <meta name="viewport" content="width=device-width, initial-scale=1.0" /> <title>Vite + React</title> </head> <body> <div id="root"></div> <script type="module" src="/src/main.jsx"></script> </body></html>As you can see, inside body there is only one html element, a div with id root and a script tag that has src/main.jsx as source.
So let's review that directory and file:
//src/main.jsximport React from 'react'import ReactDOM from 'react-dom/client'import App from './App.jsx'import './index.css'
ReactDOM.createRoot(document.getElementById('root')).render( <React.StrictMode> <App /> </React.StrictMode>,)Let's break this code down step-by-step:
ReactDOM.createRoot(_document_.getElementById('root')):ReactDOMis a library provided by React that allows us to interact with the browser's DOM (Document Object Model).createRoot()is a method from ReactDOM that creates a "root" for our React application. This root is where our React components will be rendered._document_.getElementById('root')is selecting an HTML element on the web page with the ID "root". This is where our React application will be mounted and displayed.
.render():- The
render()method is used to actually render our React application to the DOM. - Whatever we pass as an argument to
render()will be what gets displayed in the "root" element we selected earlier.
- The
<React.StrictMode>and<App />:<React.StrictMode>is a special React component that adds additional checks and warnings to help identify potential issues in the application.<App />is the top-level component of our React application. This is where the main logic and structure of our app is defined.
Now, let's dive deeper into the <App /> component in the code snippet.
The <App /> is a functional component in React. This means that it's a Javascript function that returns JSX code, which is a syntax extension for Javascript that allows you to write HTML-like code in your Javascript files.
Previous React versions also included class components. Currently there are considered legacy (not used in new project although new versions keep compatibility)
// In Javascript we can define functions like thisfunction app({title, description}){ // body of the function}// In React, a component is a function that returns a JSX object.// Its should always be an uppercase letter (PascalNotation)function App({title, description}{ return { // JSX }})// and when it's invoked instead of using app("Title", "Description"), you do:<App title="Title" description="Description"/>In JSX, the way we define attributes on HTML-like elements is slightly different from regular HTML. For example, instead of using the class attribute, we would use className in JSX. This is because class is a reserved keyword in Javascript, so React uses className to avoid any conflicts.
Here's an example of how we might use className in the <App /> component:
function App(props) { return ( <div className="app-container"> <h1 className="app-title">{props.title}</h1> <p className="app-description">{props.description}</p> </div> );}In React, components can accept parameters, called "props", that allow you to pass data into the component. These props can be accessed within the component function and used to dynamically render the component's content.
So, the <App /> component could be defined like this:
function App(props) { // Access props here and use them to render the component return ( <div> <h1>{props.title}</h1> <p>{props.description}</p> </div> );}In this example, the App component accepts props as a parameter, which could contain properties like title and description. These props can then be used inside the component's JSX code to dynamically render the content.
The JSX syntax used in the return statement of the App component allows you to write HTML-like code directly in your Javascript files. This makes it easier to visualize and reason about the structure of your UI components.
When the <App /> component is rendered, React will replace the JSX code with the corresponding HTML elements in the browser's DOM, creating the actual user interface.
So, in the context of the original code snippet, the <App /> component is the main entry point of the React application, and it can accept any necessary props to customize its behavior and appearance.
Composition
In React, the "children" refer to the content that is enclosed between the opening and closing tags of a component. This content can be other React components, HTML elements, or even plain text.
function MyComponent() { return ( <div> <h1>This is the MyComponent</h1> <p>And this is some content inside the component.</p> <AnotherComponent /> </div> );}
function AnotherComponent() { return ( <div> <h2>This is another component</h2> <p>This component is being used as a child of MyComponent.</p> </div> );}In this example, the <AnotherComponent /> is being used as a child of the <MyComponent />. The content between the opening and closing tags of <MyComponent /> is considered the "children" of that component.
The children concept in React is powerful because it allows you to create reusable and composable components. WE can build components that accept and render other components as their children, enabling us to create complex user interfaces by combining smaller, more focused components.
This flexibility in composing components is a key feature of React and helps promote the creation of modular, maintainable, and scalable user interfaces.
Now it's your turn to implement the UI with React using composition and props.
One possible implementation (Check only after you have tried for yourself ;-)
React ImplementationNext class you will learn how to add interactivity with hooks. Please install React Developer Tool extension on your browser. Here's the link for Chrome. With this tool you will be able to inspect props and state of your React components, so understanding what's happening and debuggung will be easier.
Additional Info
What is React
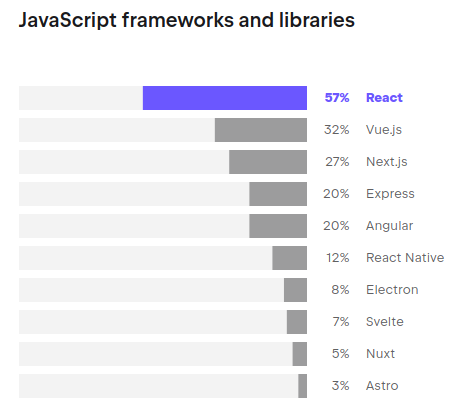
According to JetBrains' State of Developer Ecosystem 2023 Survey, React is the top library used by Javascript developers
Why React became the most popular solution to design interactive interfaces?
Christopher Chedeau, Front-end Engineering Manager at Facebook recalls a time before joining the company when he worked on a project for World of Warcraft, which required searching through 20,000 guilds. He spent months optimizing performance to display changes in real-time when filters were adjusted. However, when he tried React, he was able to rewrite the same functionality in about half an hour, and the performance was comparable.
React19
A new version, React19, is already available for testing and will include very interesting features such as server actions. The release date is expected to be later this year 2024. More info here